Creating a GitHub workflow to run CI
Checking code quality before merging the changes back to production branch is crucial. Let's guild a simple CI with GitHub actions.
Created at:
Last updated:

Checking code quality before merging the changes back to production branch is crucial. Let's guild a simple CI with GitHub actions.
Created at:
Last updated:
When you are building big projects for thousands of users with a team of other developers, there is no room for error. Quality of the code and the features you build has to be constantly checked to make sure what you build works as expected. You also want to make sure if your changes aren't breaking any of the existing functionalities.
Either in a big project, or when you are just working on something by yourself, having automated tests is the least to say beneficial. Having a good tests coverage can check for us if each of our components do what it supposed to do with unit tests. Whole modules can be tested with integration tests. Finally, we can run end-to-end tests to check the whole software from a perspective of the end user, checking some common user flows and scenarios.
In article Nextjs markdown blog/Setting up unit testing we talked about testing in general, but we also set up a unit tests suite with jest. This allows us now to locally test our application, but what if we forget to check everything before merging our newest changes back to production branch?
In this article we are going to create a GitHub workflow which will run unit tests and linting for every pull request we have to make sure everything works as expected.
For those of you who don't know what GitHub actions are, here a some explanation.
GitHub Actions is a feature provided by GitHub that allows you to automate workflows directly within your GitHub repository. With GitHub Actions, you can define custom workflows using YAML syntax, specifying the series of steps to be executed when certain events occur in your repository. These events could include actions like pushing code, creating pull requests, or even external events triggered by other services.
Some key aspects of GitHub Actions include:
Workflow Automation: You can automate various tasks such as building, testing, packaging, and deploying your code directly from your GitHub repository.
Event-Driven: Workflows can be triggered by different GitHub events like commits, pull requests, issues, or repository events. You can also trigger workflows manually or schedule them to run at specific times.
Extensive Ecosystem: GitHub Actions has a vast ecosystem with pre-built actions available in the GitHub Marketplace. These actions can be reused in your workflows, saving you time and effort.
Custom Actions: You can create your own custom actions to encapsulate reusable pieces of code or processes and share them with the community.
Integration: GitHub Actions integrates seamlessly with other GitHub features and services, as well as with external services and tools. This allows for comprehensive automation of your entire development workflow.
Flexibility: Actions can run on GitHub-hosted virtual machines or on your own infrastructure using self-hosted runners. This provides flexibility in terms of environment setup and resource allocation.
Overall, GitHub Actions simplifies and streamlines the process of continuous integration, continuous deployment (CI/CD), and other automation tasks within your software development workflow, all within the familiar GitHub environment.
More information can be found on the official documentation website
So with all this knowledge we can start building our own GitHub CI workflow.
All the workflow files have to be stored in directory in our project, so we do now create these folders. Inside we now create file which will contain configuration of our CI pipeline.
Each workflow we start by providing a name of the workflow and the list of events which are going to trigger it. There are numbers of options for the events which can trigger the workflow but in our case we just want to run the pipeline on every pull request and when changes are merged back to the branch. Additionally, we add event, so we can manually trigger the workflow.
We also added a property here. What it does in this case, it is going to cancel every action run in progress if we push any changes to our PR or to the branch. This is assured by adding a group "id" with a workflow name and the ref (which is a branch name) to each workflow run and if new run appears with a group ID for which there is a run currently in progress, it will be canceled. We do this to not waste resources.
The next step is to add jobs to the workflow. A job is a set of steps running independently of other jobs. Jobs can run in parallel if they don't depend on any other job. This will be our case.
Now we can proceed by adding our first job. It is going to check linting and formatting.
Every job can have a name, but what it has to have are:
As you can see we specified here few steps but let us first look at the main part. The defines the OS we want to run our job on. We are choosing Ubuntu as this is the most popular choice. We also have an option to use Windows or macOS.
Furthermore, we also gave the job a name. And at last we also added some timeout so we do not end up with a run hanging indefinitely in case of some error.
The steps here are calling some GitHub actions and running bash scripts. This is extremely simple example in comparison to what are these GitHub actions capable of, but this is all we need for now. So what we are doing here?
Almost identically to the previous part, we now need to add a job to run our unit tests.
Again, re are setting the name, runner and timeout. All the steps are basically the same, except from the last one which is running instead of .
If you haven't already, please create a new branch from . We are now going to open a pull request and see how our workflow is moving.
To run this workflow and see how it do we have to commit our changes and open a pull request.
Now with the changes pushed, we go to our repository on GitHub and we open a PR.
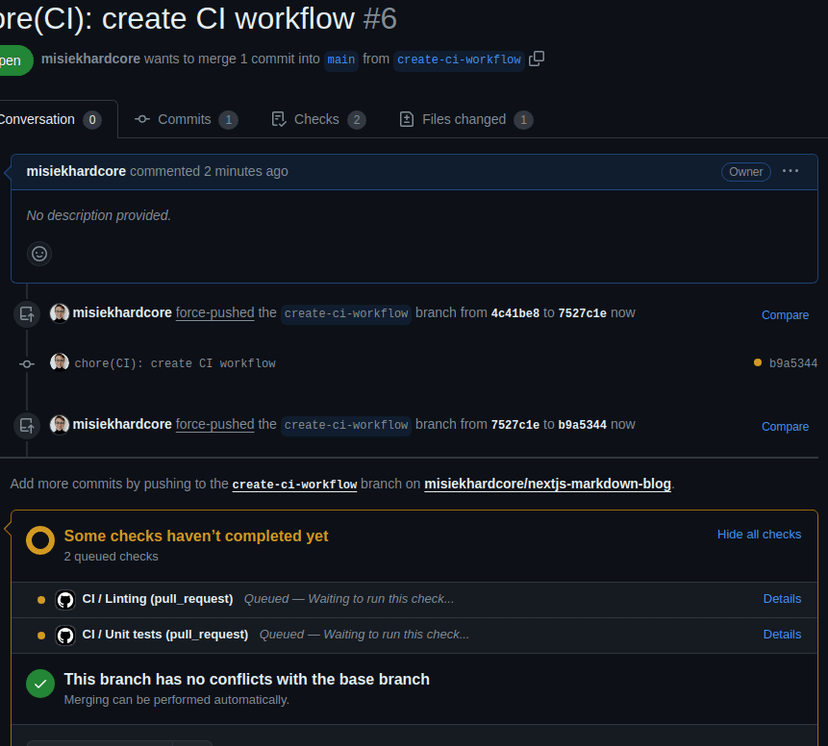
As you can see we have this section where all the checks (actions) triggered for our pull request are listed. Every job is listed here separately. As we gave each of our jobs a name as well as we named the whole workflow, we can see these names now here on the list.
We can click on Details link next to one of our jobs to open it and see the details with a console-like window showing progress of our job. Let's first take a look at linting.
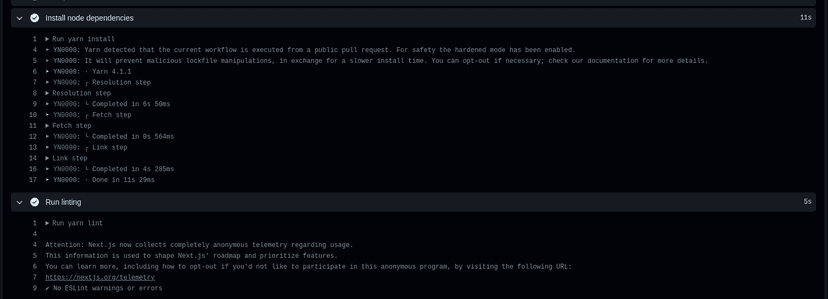
As you can see, every step is shown as a separate, collapsible section and steps are executed one by one. Linting was successful as you can see so let's check now how unit tests are doing.
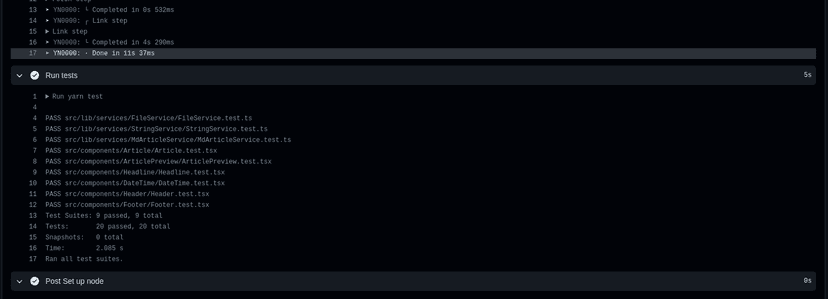
Looks like everything works as expected.
Now if you go back to the PR, the list of checks has changed its color to green as all the checks have passed.
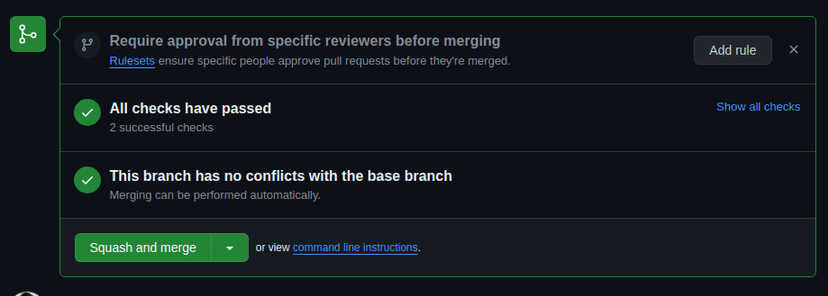
Fantastic, isn't it? Now we can be sure that at least we are delivering code which is linted and passes all unit tests. This is a good base for further extensions like integration or e2e test suits.
And this is all for now. Today we learned how important CI is and how easy it is to build automated CI pipeline with the power of GitHub actions. I really encourage you to experiment, play around and enjoy building automated workflows as they are a must-have in modern development.
As always I invite you to check other articles and to stay tuned for the next one in this series.
This is all for now! See ya!
Please Sign in to leave a comment.